


We’ve already given you a basic crash course on how to craft gear in our Introduction to Forging Beginner Gear guide. Now we’ll get into how to use different gear to your advantage.
Guide Index
Optimizing Gear Situationally
With each new season, the advancements of gear get better and our talented forgers give us more and more options to strengthen our troops in battle!
Battle Gear
One of the keys to success in battle is going in with the right equipment. Consider what your goals are and choose each piece you wear into battle to maximize your ideal outcome. Understanding how statistics apply in different situations is key to this so be sure to read up on this in our PvP guide if you’re unclear.
Seat of Power Attack
If you’re attempting to knock your opponent out of a Seat of Power, you’ll want to deal the maximum amount of damage you can with high Attack boosts. Choose gear pieces that have the highest amount of Attack, Attack vs Player, Attack While Marching vs Player, & Attack at SoP. Add Attack vs Player’s Specific Troop Type to that list if you know what you’re fighting against.
If you’re feeling too many losses then you’ll want to choose a few pieces that are higher in Defense & Health boosts to offset that.
Seat of Power Defense
If your goal is defending a Seat and outlasting their attacks, then you’ll want to maximize your Defense & Health. Choose pieces that have the most Defense, Defense vs Player, Defense vs Player at SOP, and Defender Defense, as well as Health, Health vs Player, Health vs Player at SOP, and Defender Health. Add in Defense vs Player’ Specific Troop Type to that list if you have, especially for your Counter troop type.
Siege Gear
If you need to take down an enemy’s wall, you will need to maximize your Wall Damage for effectiveness. Only a select few pieces of siege equipment offer this boost so be sure to plan out your crafting materials carefully to obtain them.
Once you’ve gotten that to a comfortable level, maximize Health & Defense boosts to keep your siege from being destroyed by enemy troops.
Keep Attack
When attacking an enemy keep, the losses can be brutal because you’re likely overpowered by numbers alone. You want to cut down the numbers quickly but you also want to conserve your troops so they can live to fight another day. Balance is key here.
Select each gear piece with the highest number of boosts overall, Attack, Defense & Health all together. Statistics that come into play here are your base Attack, Defense, & Health, vs Player, While Marching vs Player, and vs Specific Troop Types. Defense vs Specific Troop Type for your troop’s counter can be highly beneficial in this situation!
Keep Defense
When defending your stronghold, you’ll want to keep your advantage of numbers for as long as possible. Maximizing your Health & Defense will keep your troops fighting longer. Defense, & Health, vs Player, Defender Defense & Health and Defense vs Specific Troop Types all apply when defending your keep. Defense vs Specific Troop Type for your troop’s counter can again be highly beneficial in this situation!
Note that General Troop boosts will affect your entire Army. If you have 2-3 strong troop types the gains will be more beneficial then slightly larger boosts toward just one troop type. This will depend on how you have built up your keep and Army. If you have mainly focused on training one type of troop, lean into that & make it the strongest possible.
Creatures & Camps
When attacking Creatures & Camps, you want to achieve a “winning” battle result. Battle report “wins” are based on sweetheart you or your opponent has a higher survival rate, so again you’re aiming for Balance.
No “vs Player” statistics come into play, so only look for pieces with the highest amount all together of Attack, Defense, & Health, and vs Creatures boosts.
Rally Capacity
Increasing your numbers when rallying with your Allegiance could make or break a battle. The rally’s Setter can wear specific gear to allow for larger numbers to join.
Tip: Once the rally is full, you can then change back into your attack gear before battle.
March Size
One of your greatest weapons is the number of loyal troops you are able to muster! You can utilize gear to boost the size of your march in any situation. There are two ways to boost this in any given situation, with your Base March Size, and with the boost most relevant to the situation. For example, March Size vs Seats of Power will boost your size when fighting at Seats.
Tip: Once your march leaves, you can quickly change into your troop strength gear while it’s on its way to take effect.
March Speed
In some situations, you’ll want to maximize your speed, toward an unowned SOP or a distant target. There are two ways to boost your speed in any given situation, with your Base March Speed, and with the boost most relevant to the situation. For example, March Speed Reinforcing will speed your reinforcements toward a keep or SoP.
Utility Gear
Healing Gear
Healing Efficiency is one of the biggest cost-savers in the game! You can save millions in precious resources. Focus on Healing Speed as well to help save gold costs clearing your tents in the heat of battle.
As an example, below is a chart that shows the difference of normal healing costs vs the effects of Healing Efficiency of 100% on 100,000 T8 Cavalry troops:


Training Gear
Training Speed and Capacity boosts cut down on the time it takes to train your troops and grow your Army.
Below is an example of the effects of Training Speed boosts of 100% on 100,000 T8 Cavalry on troops:

Steel Efficiency Gear
Steel costs can be massive when forging high level equipment. Utilizing gear with high Steel Efficiency boosts can cut that cost greatly allowing you to craft more pieces.

Construction Gear
A good amount of gear gives Construction Speed boosts that break down the building time for upgrades that may save you precious days on those long builds.
Research Gear
The costs of research can be cut down with Efficiency and Maester Speed boosts available. Be wary of what type of research you wish to study, as these pieces can often be specialized toward Military or Dragon research.
Resource Production Gear
Maximizing your Food, Wood, Stone & Iron Production over time is a good way to make your resources go further.
How to Find Specific Boosts
You can look for gear which will provide you with any of the above in your Smithy by using the filtering function in the top left corner of the Recipes page.


Saving Gear Loadouts for Easy Use
I know what you’re thinking! This is a lot to keep straight and stay organized. You can save your Gear Sets together in each different gear loadout slot at the bottom of your profile once loaded to quickly select the gear you need for each situation. Watch the GIF below for an example of this working in real time.
More slots can be unlocked in the Logistics research section. It may not seem like it now, but these loadout slots will become an extremely valuable tool that will save you lots of time and heart ache.
Trinkets
Additionally, to Event Gear, new Trinkets are released at regular intervals that can offer some great gains but are difficult to acquire. The Advanced Materials can be hunted during the release event but generally unobtainable outside of these events unless they are added to new Trinket Armory. Stock up while you can!
How to Craft
Unlike other gear, in order to craft higher levels you must use the same piece of the level below it. No templates can be purchased and no other gear can be smelt to craft these. Start with a level 1 piece of the trinket you’d like to craft and build up from there. Be careful to plan out your material needs and take fewer risks as there is no re-do option here! If your crafting fails to reap you the quality of piece you had wanted, you must start back at 1 for the whole process.
Armory Optimization
Each set of Event Gear released has a special place in the Smithy called the Armory to display your equipment when not being used. Doing this can give you solid boosts that are in effect at all times.
Unlocking Different Boosts
Each Armory has three different boosts which have different requirements to unlock. The first requires 6 items of Poor quality or better, the second 4 of Fine, the third 2 of Legendary. Take a look at the three boosts that you can unlock with the Wildling set below:

If you only wish to boost one or two of these you only need to fulfill the requirements of those you need. For instance, if you do not use Ranged troops but want to boost your rally capacity, you can fill the below Wildling Armory with 4 Fine quality equipment and leave the rest empty.

Once you unlock a certain line, you will see the effects of higher collection levels within that stat line as you upgrade and add pieces! See below that adding a level 35 piece to this Armory nearly doubles the effect of the Rallied Troop Capacity boost.

Armory Optimization
Gaining more power in your Armory can seem like a grueling task. Percentages seem small, but knowing which gear levels and qualities give the most collection points can help you navigate and plan your collections to maximize your benefits!
For instance, a level 25 Legendary piece of equipment will give you more gains in the Armory than a level 35 Fine. Whereas a level 40 Poor offers more points than a 35 Exquisite.
Depending on your levels of Crafting Materials and Steel to work with, you may want to choose to craft lower level pieces of higher quality, or higher-level pieces of lower quality. You can view your current Steel available and the amount it would take to craft each piece in your Smithy when you go to craft a piece. Your current open Steel is at the left & requirement for the piece at the right. (This number is already adjusted with any Steel Efficiency boosts you currently have active). You can open additional boxes from your inventory by tapping the blue plus sign button.

Plan out which level and quality of pieces will get you to your desired level ahead of time, so you’re not disappointed in the results. The point requirements go up for each level, and the percentage gains fluctuate, so certain levels are more or less beneficial to reach for.
You can preview your gains through the information panel on each collection by tapping the blue progress arrow button below.

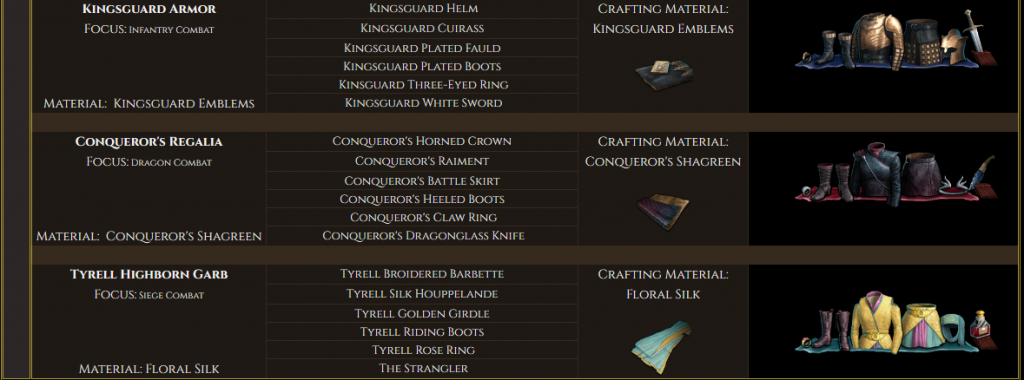
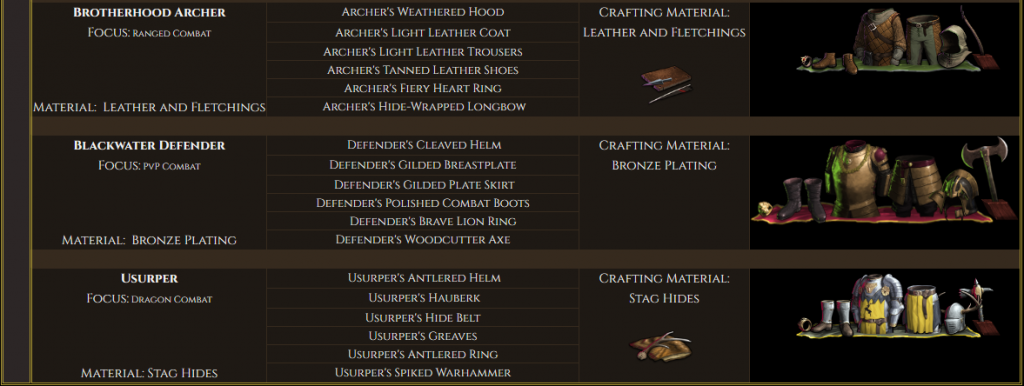
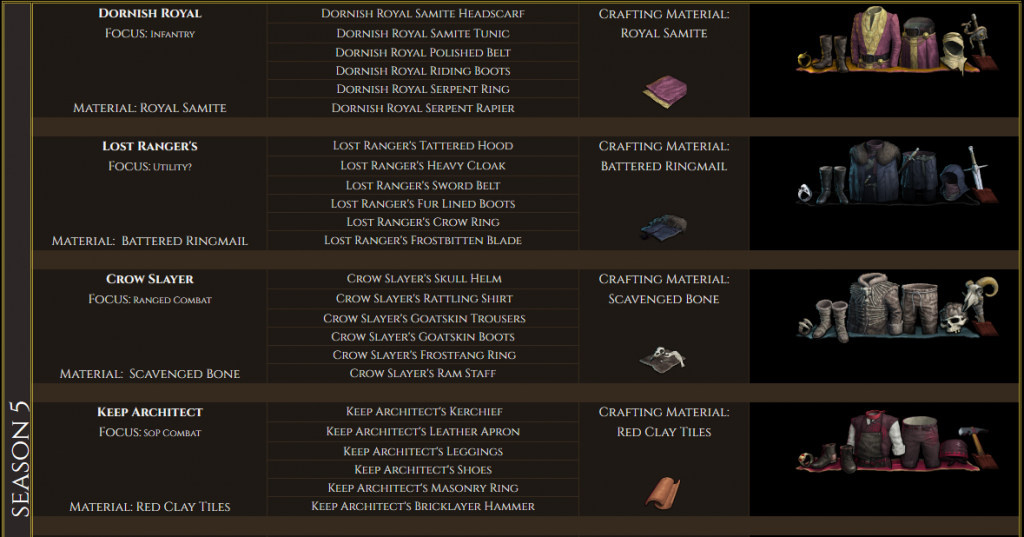
Event Gear
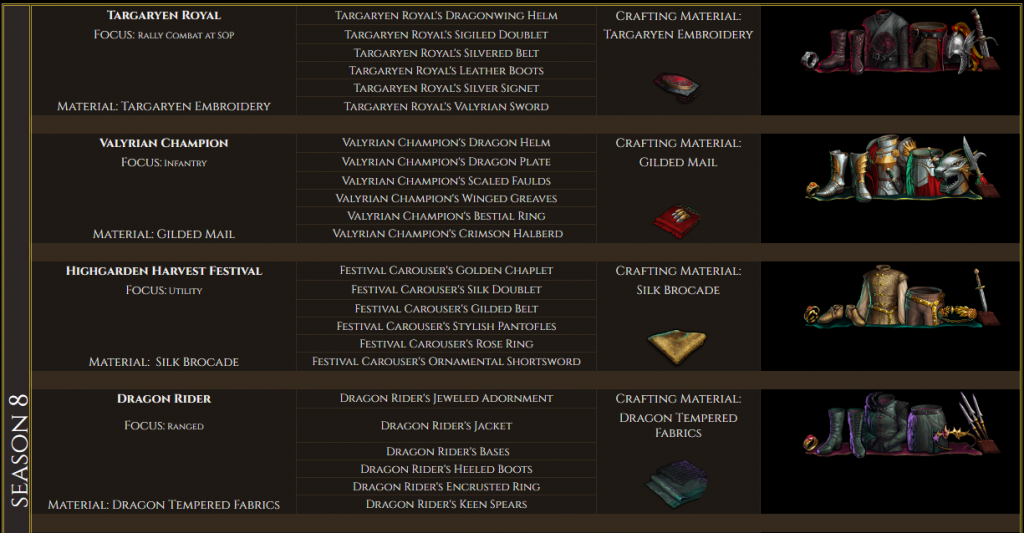
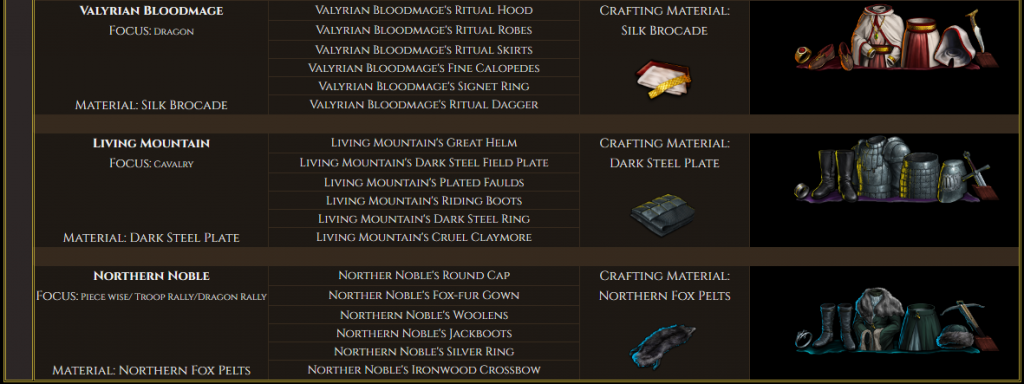
We’ll close this guide out by giving you a full recap of Event Gear sets by type & in order of release date. As we said earlier, each new set gives new and better advancements to give higher gains! However, there are pieces in every set that you may find useful or easier to craft for a certain purpose. Spend some time familiarizing yourself with the pieces and in each when putting together your sets and see what works best for you.
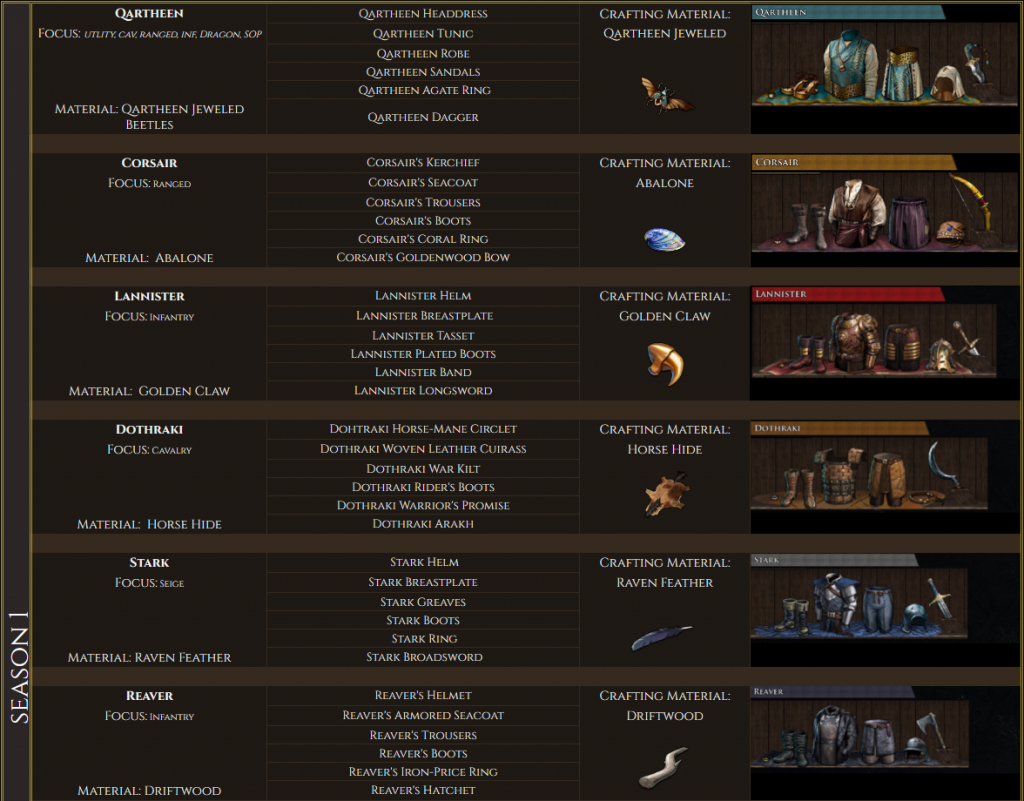
Season 1 Gear
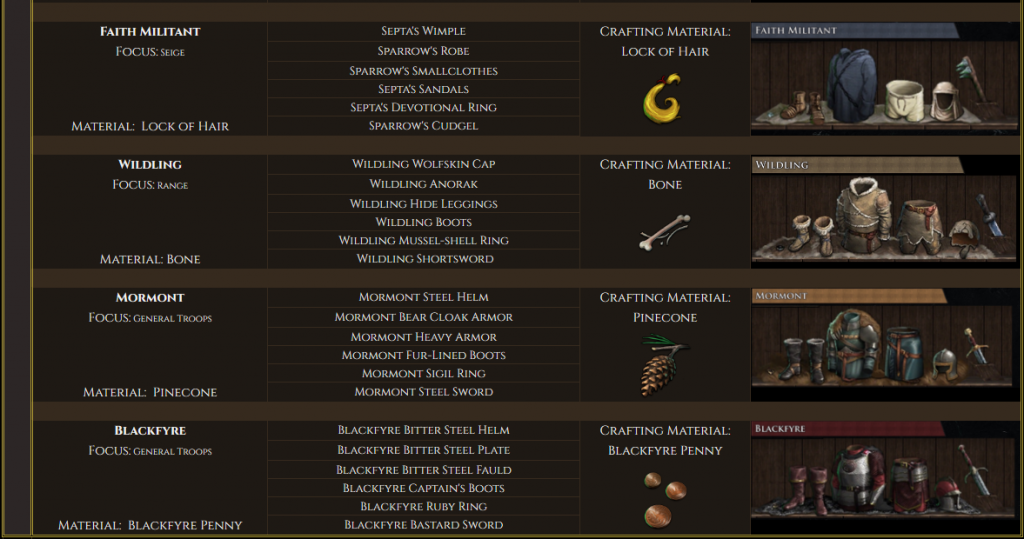
Season 2 Gear


Season 3 Gear

Season 4 Gear

Season 5 Gear
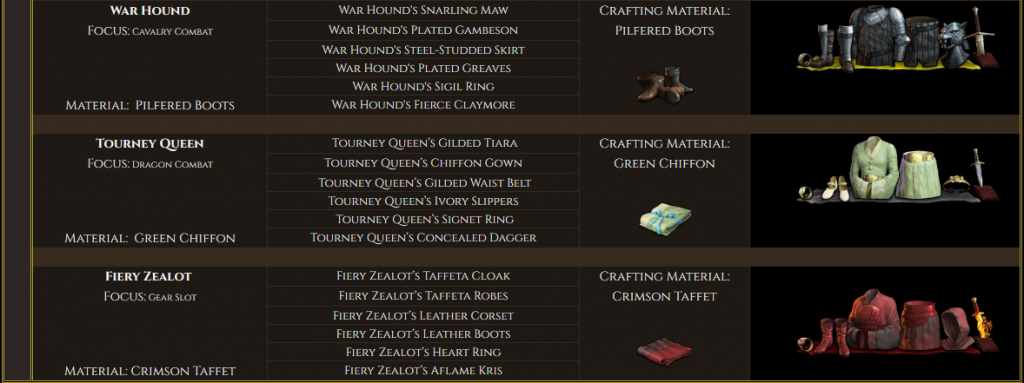
Season 6 Gear


Season 7 Gear

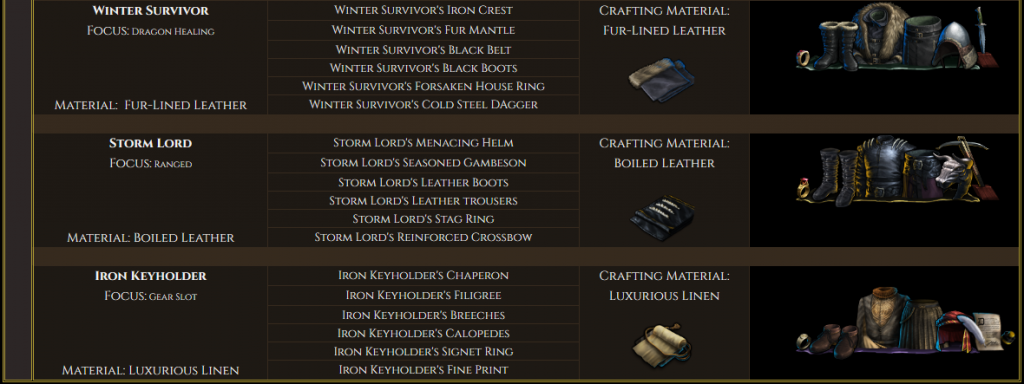
Season 8 Gear