


Understanding how your Military functions, its strengths and its weaknesses in different situations, plays a key role in the success or failure of your endeavors. We’ll do a deep dive here into how they work, what adds up & when they function!
Guide Index
Keep Battle
A good amount of gameplay comes from learning your opponents and attempting to kill the bulk of their Army at home, while they’re unprepared to defend themselves, and take their resource stores for your own! It’s brutal but it’s the nature of war.
Defending Against Players
We touch on a good amount of preventative strategy in My City Is Under Siege guide. Once you become strong enough that your Army’s defenses can handle enemy attacks, there are ways to maximize damage on your opponents!
Wearing Defensive Gear helps your troops survive longer to continue to overpower the attacker. Stock up on Defense and Health rich pieces. Watch that the stats listed on the piece are not “while marching” because they will not be effective in defense of your keep! More on this later in the guide.
Enlisting Reinforcements from your teammates can increase your keep’s strength if being attacked. You can increase the amount of reinforcements your keep holds by upgrading your Rookery.
Traps are another way to inflict pain on your enemies. As long as there’s at least one troop in your keep, traps will continue to be effective deterrents if well researched. Read more on how they function in our Troop Types & Nuances guide.
Tip: If you have a Main Troop Type that you focus on, a good idea is to focus on traps that attack your Counter troop type you are weak to.
Attacking Other Players
Killing an enemy’s troops before they grow strong enough to challenge you is a cornerstone in Westerosi strategy.
Looking for Targets on the vast world map can be daunting, but once you understand where opponents are likely to settle, near Seats of Power after a battle or in prime hunting ground, scanning the map will become more fruitful.
Scouting will give you invaluable info on the Quantity & Type of troops a player has focused on. It will also let you know if they have a large amount of traps and the size of their Dragon. However, it will alert the player that you are scouting them & possibly give them time to react and defend themselves. The key to attacking a keep is catching them off-guard!
Tip: The level of scouting detail is dependent on your Watch Tower level, read more about this in our Building Types and Purposes guide.
Pre-Scout Intel can be learned from a player’s keep and profile without alerting them of a coming attack.
Pay attention to the below traits when evaluating a potential target:
- Their Keep Level will let you know what Tier of troops they likely have.
- The Power Level listed in their profile will give you an idea of the quantity of troops you will likely face.
- Their House Level will give you a hint at how strong their Armory might be, giving them better statistics in battle.
- You can view what size of Dragon they have from the right tab in their profile.
- Lastly, the gear they are currently wearing will have a large effect on the battle. If they are wearing Utility gear it will make for a much easier attack!
Attacking as an Allegiance will help cut down on losses greatly. Strategize with your team on the best ways to tackle rallying and look to them for intel on the potential target’s gameplay habits and strength!
Seat of Power Battle

Benefits of Seat of Power (SoP) Ownership
Seats of Power can gain you and your teammates crucial footholds within the kingdom by way of Title and Regional boosts in all aspects of gameplay. From battle statistics and march size gains, to healing and steel efficiency bonuses, the rewards go far in lowering the costs of battle.
Ownership Bonuses benefit only the owner of the Seat (as long as they keep enough bannermen to qualify) and give a variety of battle, march size, and general gameplay boosts. View these by tapping on the Information button on its banner, either in the SoP Information Screen or your Profile.

Regional Bonuses are gained by everyone in your Allegiance whose keep resides in a region under the influence of your SoP. These tend to be small bonuses and numerous, but some such as Storm’s End with its 20% Steel Efficiency and King’s Landing with its map-wide 30% Infantry Attack boost hold larger more noticeable bonuses.
Regional Bonuses can be viewed in the Information Page of each Seat of Power.

You can view which Seats any tile is under the influence of by tapping the Information button on the tile.

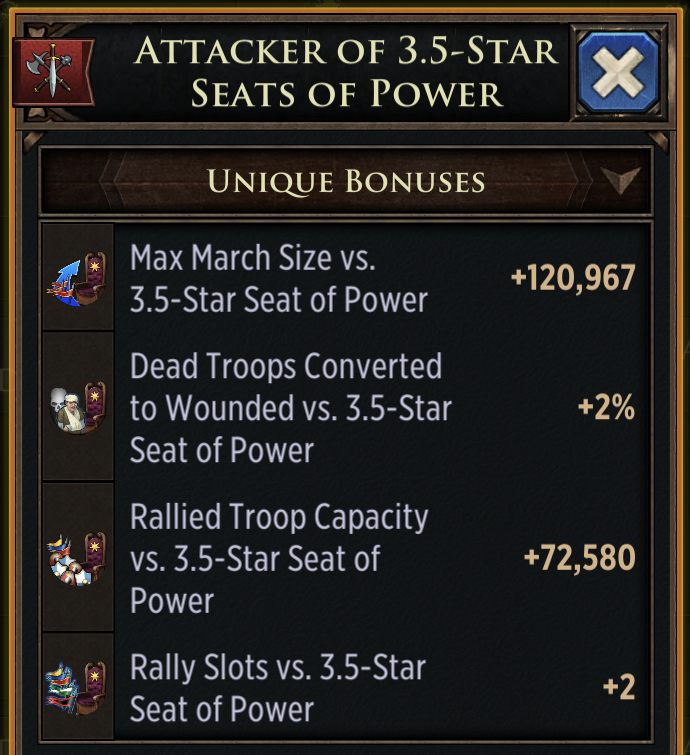
Titles can be bestowed on your teammates interchangeably. The details of each can be viewed from the SoP Information menu. Each SoP has between 2-6 titles each that give statistical gains, as well as Attacker titles for the next SoP star level. Which brings us to…
Climbing the Ladder
Each Seat gives its owner march size benefits and potential reinforcements that are difficult to counter without the use of equivalent boosts in march and rally size when attacking. Owning the Seat a half star below the one you wish to attack will give you a march size and rally capacity boost to be used toward it! It also gives Attacker titles with the same bonuses to give to your teammates for support in battle.
Basic Mechanics
Takeover Marches
You must have a certain number of Bannermen pledged to you in order to take different levels of Seats. (You can view these requirements in the top right corner in the Information page of each SoP). If you meet those requirements, you can send an attack which will take Ownership of the SoP if it is emptied of troops & the wall health is fully depleted as a result of the battle.
Reinforcement Marches
Anyone in your Allegiance can Reinforce each other’s Seats. There is an increasing capacity for these reinforcements as they increase in star level.
Wall Damage
Each SoP starts with 26% Wall Health when taken. This grows as long as the Seat is defended! To take Ownership from another team the Wall Health must be depleted to 0%. This can only be accomplished with the use of Siege troops and a winning battle report. The strength of your Wall Damage will determine the amount of health depleted with each hit.
Tip: The higher the SoP star level, the more Wall health it will have! We’ll get more into detail on this in our Seat of Power guide.
Abdication
When you tap the Abdicate button on your SoP, there will be an automatic Peace Shield bestowed on your Seat in order to safely hand over ownership to a teammate. It lasts for three minutes only & cannot be used multiple times in a row since there is a long cooldown timer. This cooldown timer will reset after the SoP is released to NPC or owned by another Allegiance.
Giving Titles to your Allegiance Members
You can do this through the Bannermen tab in your profile. Tap the blue button with three lines ![]() next to their name and select the option to Assign/Switch Title.
next to their name and select the option to Assign/Switch Title.
Rallying
You can choose to take time to gather your teammates together for a coordinated attack by setting rallies instead of attacks.
Once a rally is set, your Allegiance members will all have visibility to them at the left of their screen.
From this rally menu they are able to see who has set the rally, where it is set & its target, how long they have left to reach it before it leaves, and the teammates & power currently in the rally. Rallies can be joined or cancelled from the rally menu.
If no one joins your rally, it will automatically be cancelled and will not leave for its target.
Defense
On your own, defense of your Seat of Power has many Disadvantages:
You are limited in your number of reinforcements compared to enemies with titled march boosts at each star level. Call out to a teammate for help to reinforce your SoP to offset this imbalance.
You also have little knowledge of incoming rallies. Unlike keeps, you will not receive any notifications of being rallied until the attack comes. Keep a watchful eye for enemy troops gathering at others’ keeps to know when a coordinated attack may be coming.
Research and investment in While Marching statistics is plentiful and only benefits you in Offensive maneuvers. Look for Defender boosts where you can to offset your opponent’s stats.
A couple major Advantages:
In defense your troops are better protected by the sound walls and ample supplies of your holdfast. They will only be wounded in battle as long as there is room for them in your medic tents! Your opponents’ troops may perish.
Also, you are able to have combined march size and statistic boosts from your Title at once, whereas your opponents must choose one or the other!
Allegiance Defense
Defending a Seat together with your Allegiance offers strong advantages to Solo play. You are able to defend against rallies with carefully planned reinforcements, gathering the strongest in your team and balancing their troops so their strength is not easily countered. Titles can be given out to the teammates reinforcing you in order to boost their defenses further!
However, keeping a Seat full is essential to staving off attacks, and each attack will deplete your forces. Keep teammates close to replenish reinforcements quickly as the troops fall.
Attack
Offensive play at a Seat of Power has two major Disadvantages:
Your march size will be overwhelmed by your opponent’s Ownership boosts. Gain an Attacker Title to offset this weakness.
Your troops will be killed in the attack, whereas your opponent’s will only be wounded. Be wary of potential losses by sizing up your opponent and avoiding risk of hitting fully reinforced Seats.
The only way to offset this is through your Dead Troops Converted to Wounded boost.
This is currently only offered through research in your City Defense tree called Red Priest ![]() & earning its Maester’s Links, and now additionally with Melisandre one of our new Heroes!
& earning its Maester’s Links, and now additionally with Melisandre one of our new Heroes!
Dead Troops Converted to Wounded in action:
Each percentage you gain of this boost will save that percentage of your Killed troops to be Wounded instead. All of your injured troops would die in the battle if not for this key boost!
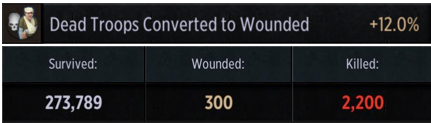
Total Troops fallen in battle = 2,500
12% x 2,500 = 300 saved!
Your Advantages when attacking are plentiful however, with larger potential march sizes and higher boosts While Marching than your opponent.
Allegiance Coordinated Attack
As a team you are able to rally fully reinforced Seats to deplete their troops. Make use of Attacker Titles to overwhelm their reinforcements and catch your enemy off-guard so they aren’t prepared to refresh their forces!
Strategic Terrain Battle
Special Events generate unique tiles called Strategic Terrain (also called “Nodes”). These are your only chances to go toe to toe with your opponent’s one on one without teammates or titled march size boosts interfering. Take advantage of these when you see them to test your strength & wit!
You are only permitted to attack or occupy a certain level node according to your Keep level, so this also keeps you hitting within your weight class, a favorite of players with smaller keeps in their kingdoms.
The rock, paper, scissors aspect of gameplay referred to in our Troop Types & Nuances guide comes into play here in a big way. The goal is a “Winning” battle report, which either evicts the current owner of the Node or sends the attacker home empty handed!
In order to have a technical “win” in your report, you need a higher % survival rate than your opponent, so the key here is balance.
Statistics in Play
We’ve already introduced you to stats on a basic level; see our Viewing & Understanding Stats guide if you haven’t already. What we’ll get into here are more complex details on how and when they factor into your battles.

What you are able to view about your own boosts is much more detailed and inclusive than what is viewable by your enemies in the battle reports, to give you more information on where each boost is coming from. This can however be daunting even for seasoned players to digest. What factors make one Cavalry Troop more successful than another?
Effects of Statistics in Battle Reports
Firstly, as in any war, a troop’s key attributes have the same effect whether attacking or defending. What kind of impact does Attack, Defense & Health have on your battles, you ask? Great question!
- Attack – only affects your opponent’s troop survival rate.
- Defense – only affects your own troop survival rate; It has no effect on your opponent’s march.
- Health – works together with defense, but this functions as a total health bar whereas defenses keep the health bar from depleting.
Breaking Down Your Boosts
From your Profile and within the Dragon Pit you are able to see everything affecting your troop’s stats in a battle. To understand what you are looking at, you need to understand that some stats are Additive and are built into others.
TROOP STATS– as viewed from your Profile
The GENERAL TROOP stats are already included in each of the corresponding TROOP SPECIFIC stats you see! (For the purposes of this page I’ll use INFANTRY for all the troop specific stats, but general troop apply to all troop types)
TROOP ATTACK is already built into the INFANTRY ATTACK you see there; same with defense & health

TROOP ATTACK VS PLAYER is already built into the INFANTRY ATTACK VS PLAYER you see there; same with defense & health

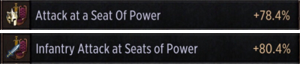
ATTACK AT A SEAT OF POWER is already built into the INFANTRY ATTACK AT A SEAT OF POWER you see there; same with defense & health
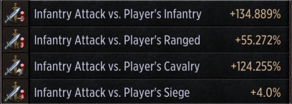
VS SPECIFIC TROOP TYPE stats are separate and stand alone, not inclusive of others.
These are only available for Attack & Defense. Since Health works as a total health bar, it does not differentiate between different types of opponents.
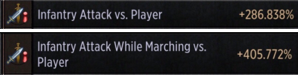
INFANTRY ATTACK VS PLAYER is already built into the INFANTRY ATTACK WHILE MARCHING VS PLAYER you see there, as with defense & health.
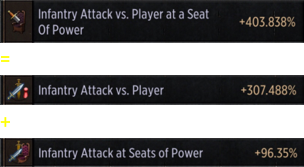
MARCHER INFANTRY ATTACK VS PLAYER AT A SEAT OF POWER is simply a COMBINATION of INFANTRY ATTACK WHILE MARCHING VS PLAYER and INFANTRY ATTACK AT A SEAT OF POWER as with defense & health.

INFANTRY ATTACK VS PLAYER AT A SEAT OF POWER is the same as the above stat, but utilizes the VS PLAYER instead of WHILE MARCHING VS PLAYER statistic!
DRAGON: TROOP STATS
– as viewed from your Dragon Pit
Look for the below abacus symbol when in your Dragon Pit! The stats you see here display everything that affects your Troops when accompanied by your Dragon, as well as your Dragon stats themselves. These won’t be found in your Profile stats.
The stats that affect your troops when your Dragon is present will all have a “Dragon:” in front of them. Everything you see here works the same way as the above stats. GENERAL TROOP stats are already included in each of the corresponding TROOP SPECIFIC stats you see.
– as viewed in a Battle Report
When you view a battle report with your Dragon included, then the troop stats in the report will already include the same stats with Dragon: in front of them from your pit.
DRAGON STATS
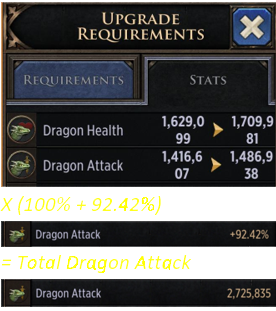
– as Viewed from your Dragon Pit
With Dragon Stats themselves, the numbers listed there are already inclusive of the % boosts applied.
Example-
Dragon Base Attack
1,416,607
How they all Come into Play Situationally
All these different stats can seem pretty daunting & complicated. When you understand that only a few Inclusive stats come into play in each situation it will help simplify things for you.
The below is how Attack & Defense stats stack in different situations. (For the purpose of this guide we’ll use Attack as the example, but Defense works in the same way in each situation.)
Health stats work in the same way as well but don’t include vs Specific Troop Type stats as they’re unattainable for health.
ATTACKING A KEEP or node
- Infantry Attack
- Marcher Infantry Attack vs Player
- Infantry Attack vs Specific Troop Type
DEFENDING A KEEP or node
- Infantry Attack
- Infantry Attack vs Player
- Defender Attack
- Infantry Attack vs Specific Troop Type
ATTACKING A SEAT OF POWER
- Infantry Attack
- Marcher Infantry Attack vs Player at a Seat of Power
- Infantry Attack vs Specific Troop Type
DEFENDING A SEAT OF POWER
- Infantry Attack
- Infantry Attack vs Player at a Seat of Power
- Defender Attack
- Infantry Attack vs Specific Troop Type
ATTACKING A CREATURE!
- Infantry Attack
- Attack vs Creatures
Determining Your March Size
As with any Army, the number of troops you are able to muster has a big effect on the outcome of a battle. March Size has a major effect on your total power. This also changes in different situations based on your personal boosts.
March Size is the base number of troops you can send in all situations.
Increase Single March Size vs Player is added to your base March Size when attacking a keep.
March Size vs Seats of Power is added to your base March Size when attacking a Seat of Power.

Examples-
Attacking a Seat of Power:
105,992 (March Size) + 1,433 (March Size vs Seats of Power) = 107,425
Attacking a Keep:
105,992 (March Size) + 4,570 (Increase Single March Size vs Player) = 110,562
Reinforcing a Keep or Seat of Power (without additional Regional or Title boosts):
105,992 (March Size)
Additional Regional and Title Bonuses below may also add onto these numbers when Reinforcing:

How This All Affects Your March
Boosts don’t mean much unless you’re applying them to a number. Each Troop Type and Level have different Base Statistics as we’ve learned from our Troop Types & Nuances guide.
For example, T9 Infantry has a Base Attack number of 55.
Once you have that Base number, you can then apply your Boost % to it for an adjusted strength of each troop.
55 X a boost of 20% (100% + 20%) = 66 Attack per Troop
Once you know the adjusted strength of each troop, then you can multiply that by the number of troops in your march!
66 Attack per Troop X 70,000 troops = 4,620,000 total Attack power in your March
Below chart shows the base stats of each Troop Type & Level:
That just about wraps up our PvP guide for Game of Thrones: Conquest. We hope that this guide has helped to expand your knowledge and prepared for the battles to come. If we missed something that you think should be included in this guide, make sure to let us know in our Discord channel.
“Power resides where men believe it resides. It’s a trick, a shadow on the wall. And a very small man can cast a very large shadow.” – Lord Varys